
How to Improve Legacy Code w/ Characterization Tests
Ever been so scared to change your code out of fear you’ll break something?
You’re not alone.
Been there.
Over the last months, I’ve been hella busy with The Software Essentialist and the first edition of solidbook, but I wanted to take a minute to address this common question, which is:
How do you deal with legacy code? How can you get started improving it safely?
And it’s a great question.
If you asked me way back when I first started out, I would have thought to look to Domain Driven-Design and how to refactor from unstructured to structured code.
I’d have opted for tools like Event Storming and Event Modelling to think through the design properly and re-write it.
And while that stuff is cool and essential (in a separate phase), there’s actually a more important stage first, and it’s not sexy.
You’ve got to characterize your code, mate.
Which (and I know you don't wanna hear this, because I also didn't want to back then) means learning how to write decent tests first 😂 .
Tests are the key to entropy reversal
If you’ve read the early drafts of solidbook, you’ll recall that I talk about entropy — a naturally occurring phenomenon whereby the universe has a tendency towards complexity. Chaos. Disorder.
You know, the dishes piling up in the sink.
Your plans with friends getting cancelled because someone caught the flu.
That’s life. Things get messy.
And as a wise man with a long grey beard probably once said,
“It is what it is.”
Well, over the years on my search for the answer to “how to write scalable, testable, flexible code”, I paid more attention to metaphysics and how reality tends to work.
Why?
It’s like what Ray Dahlio says in his excellent book Principles,
“Truth — more precisely, an accurate understanding of reality — is the essential foundation for producing good outcomes.”
Before I discovered my own set of principles which would eventually become The 12 Essentials that guide literally everything we do in The Software Essentialist, I learned that tests (or more generally — contracts) are the initial key to reversing entropy.
In other words, if you want to make your code better, it’s always going to start with a layer of code that documents what’s coming in the next layer of code.
And that’s a test.
Characterization tests
First of all, let’s clarify.
What’s legacy code?
I’m paraphrasing Michael Feathers when he says that “legacy code is code without tests”.
That’s a sharp distinction, but it makes sense to me.
What is a characterization test?
Simply, it’s a test that you write after the fact.
Basically, it’s a test against legacy code.
And what do we do?
We determine the characteristics of the codebase as it is, and we lay down tests that express the behaviour.
Why? It stabilizes the codebase so that you can do more invasive things moving forward.
It’s kinda like a tailor putting pins in your jacket and checking with you before cutting into the fabric.
“Let’s just make sure it’s right before we continue.”
Characterization tests merely document what the code already does.
Lemme show you how it works.
Example code
Let’s consider an example shall we?
Imagine a Classroom System domain. And imagine it was all written in a messy index.ts or something.
Here’s a submitAssignment API call.
// POST student submitted assignment
app.post("/student-assignments/submit",
	async (req: Request, res: Response) => {
  try {
    if (isMissingKeys(req.body, ["assignmentId", "studentId"])) {
      return res.status(400).json({
        error: Errors.ValidationError,
        data: undefined,
        success: false,
      });
    }

    const { studentId, assignmentId } = req.body;

    // check if student assignment exists
    const studentAssignment = await prisma.studentAssignment
	    .findUnique({
	      where: {
	        studentId_assignmentId: {
	          assignmentId,
	          studentId,
	        },
	      },
	    });

    if (!studentAssignment) {
      return res.status(404).json({
        error: Errors.AssignmentNotFound,
        data: undefined,
        success: false,
      });
    }

    if (studentAssignment.status === "submitted") {
      return res.status(400).json({
        error: Errors.AssignmentAlreadySubmitted,
        data: undefined,
        success: false,
      });
    }

    const studentAssignmentUpdated = await prisma
	    .studentAssignment.update({
	      where: {
	        studentId_assignmentId: {
	          assignmentId,
	          studentId,
	        },
	      },
	      data: {
	        status: "submitted",
	      },
	    });

    res.status(201).json({
      error: undefined,
      data: parseForResponse(studentAssignmentUpdated),
      success: true,
    });
  } catch (error) {
    res
      .status(500)
      .json({
	      error: Errors.ServerError,
	      data: undefined,
	      success: false
	    });
  }
});
Aside from the barebones design, there’s a lot of logic here.
Some application logic. Some business logic. Some validation, some errors & exceptions.
Lots going on here, and lots of room for things to go wrong. And they will, and without tests, it’s going to feel pretty painful to keep your code in check over time without a lot of manual testing.
Let’s not go that road.
Creating a test rig
If you’re new to high value acceptance testing, know that there are 3 types of excellent tests we can write which will give you a MASSIVE amount of confidence in your code, if done correctly:
- high value e2e
- high value unit
- high value integration
But to write any of these, you’ll first need to set up a test rig.
What is a test rig?
I love this concept.
Admittedly, if you’re only used to writing a few Jest unit tests here and there, this might feel a bit odd to you.
But a test rig is a specific architectural component you create which is responsible for running your high value tests against either your frontend, backend, or both.
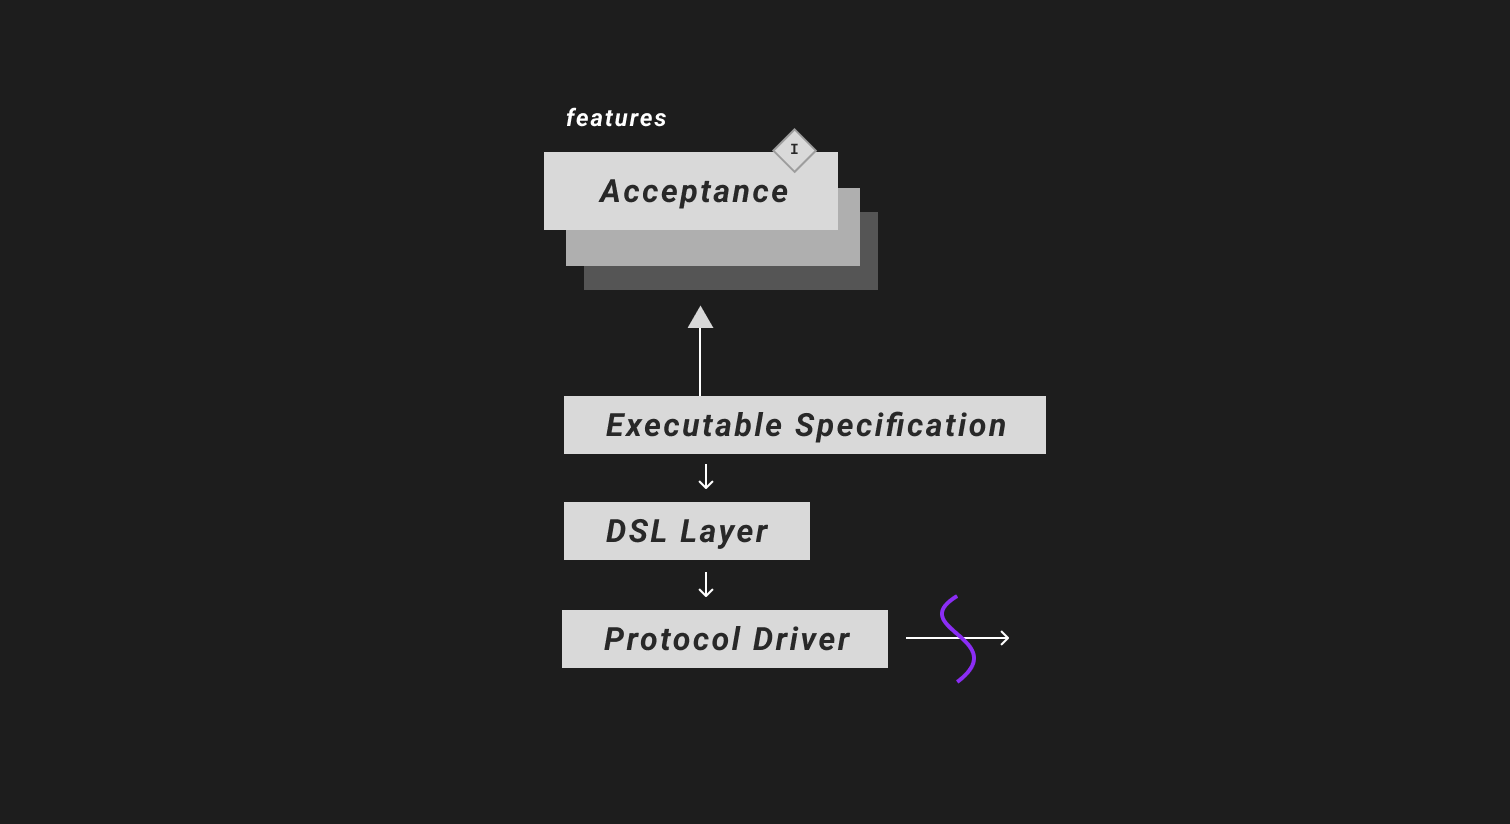
 Comprised of 4 layers:
- acceptance test specification layer
- executable specification layer
- domain specific language layer
- protocol driver layer
... this is the first thing I teach to developers in the Best Practice-First phase of craftship once they’re past the basics of testing and they’re ready to get serious.
It’s a little bit different on the frontend vs. the backend, but those 4 layers are always present.
From user stories to high value e2e acceptance test
Using high value e2e tests
Once we set up this 4 tier architecture, we’ll be ready to start characterizing our code.
Now, I recommend for most scenarios, to use high value e2e or high value integration tests to test your features.
If you’re characterizing a backend, there’s little value in choosing integration over e2e.
If you’re characterizing a frontend, high value integration tests can be extremely powerful, but for you to do that, you need to know how to decouple from React/the view layer (but that’s another email).
The user story
We’ll do one for now, but imagine you had a ton of features you wanted to make sure work safely first before you change anything.
You’d start by gathering up those user stories.
You can write 'em rough. Here's what I gather from this code.
As a student
    I want to submit an assignment
    So that I can get a grade
Dope.
What’s next? The test.
Writing the acceptance test
I’m a huge fan of Gherkin, a way to express your functional using Given-When-Then in a super human-readable way.
Gherkin is great, and it’s pretty much a BDD staple for testing.
To continue, I’d express that story as a Feature using jest-cucumber, document the success case, and then document the many edge cases I think I’m noticing as well. I’ll just do one for now.
Feature: Submit an assignment

    As a student
    I want to submit an assignment
    So that I can get a grade

    Scenario: Successfully submit an assignment
        Given I was assigned to an assignment
        When I submit the assignment
        Then It should be marked as submitted

    Scenario: Fail to submit an assignment twice
        And I submitted the assignment
        When I submit the assignment again
        Then I should see an error message
Writing the executable specification
Then comes the executable specification — the actual test file itself.
Most of us are somewhat familiar with these, although maybe not using the Gherkin/acceptance test specification strategy. Here’s what that test could look like:
...

const feature = loadFeature(
  path.join(__dirname, "../features/submitAssignment.feature")
);

defineFeature(feature, (test) => {
  afterEach(async () => {
    await resetDatabase();
  });

  test("Successfully submit an assignment", ({
	  given, when, then
	}) => {
    let requestBody: any = {};
    let response: any = {};
    let studentAssignment: StudentAssignment;

    given("I was assigned to an assignment", async () => {
      studentAssignment = await studentAssignment
	      .fromStudent(studentBuilder)
	      .andAssignment(assignmentBuilder)
	      .build();
    });

    when("I submit the assignment", async () => {
      requestBody = {
        studentId: studentAssignment.student.id,
        assignmentId: studentAssignment.assignment.id,
      };

      response = await request(app)
        .post(`/student-assignments/submit`)
        .send(requestBody);
    });

    then("It should be marked as submitted", async () => {
      expect(response.status).toBe(201);
      expect(response.body.data.status).toBe("submitted");
    });
  });
The domain specific language
Notice the language that I use to set up the test:
studentAssignment = await studentAssignment
  .fromStudent(studentBuilder)
  .andAssignment(assignmentBuilder)
  .build();
This stuff.
Ah, the wonderful Builder Pattern. I’ll explain more in a coming email later this week, but I love these.
Extremely powerful. Extremely declarative. Extremely versatile pattern.
The protocol driver
The protocol driver is what actually crosses the threshold, taking us from one system (our test rig) to the actual system itself (the backend, in this case).
I opted to use supertest here, but sometimes I’ll actually build my own apiClient for many, many reasons which I’ll also get to another time.
when("I submit the assignment", async () => {
  requestBody = {
    studentId: student.id,
    assignmentId: assignment.id,
  };

  response = await request(app)
    .post(`/student-assignments/submit`)
    .send(requestBody);
});
How to continue?
If you characterize your features first using the 4-tier acceptance test rig, you’ll be in great shape.
That’s the main idea.
I recommend spending some time getting this blanket of tests down first before you make any invasive changes/refactorings, because honestly — you could have some bleed-over between your Vertical Slices (your API calls).
While I could go on, this email is already pretty long.
I'll wrap it here for now.
Enjoy the rest of your week ~
As always, To Mastery
Khalil
Stay in touch!
Join 20000+ value-creating Software Essentialists getting actionable advice on how to master what matters each week. 🖖
View more in Testing