
How to use Prettier with ESLint and TypeScript in VSCode

This post is a part of the Clean Code Tooling series.
You may want to read the previous post.
1. How to use ESLint with TypeScript
Intro
In the previous article in this series, "How to use ESLint with TypeScript", we learned how add ESLint to our project and configure it to determine if our code was adhering to our project's coding conventions.
This is great, but it can get pretty annoying having to re-run npm run lint everytime we want lint (and optionally fix) our code.
Here's where Prettier, particularly the VS Code extension for Prettier, comes in.
Understanding Prettier
Prettier is an opinionated (yet fully configurable) code formatter. ESLint can kind of format code too, but it's mostly intended to sniff out when we're not following the mandated coding conventions.
Prettier can be configured to format your code (makes it look prettier 😉) after you save a file or manually tell it to, and by default, it comes configured with a set of common code cleanliness rules.
We get the most benefit out of Prettier when we combine it with ESLint though.
Using Prettier with ESLint
Combining both ESLint and Prettier, the responsibility division is this:
- ESLint defines the code conventions
- Prettier performs the auto-formatting based on the ESLint rules
Now that's a bomb combo.
Goals for this blog post
At the end of this post, you should be able to:
- Set up Prettier for a TypeScript or JavaScript project
- Decide on the formatting configuration that best suits your style
- Configure Prettier to work with ESLint
Prerequisites
- A code editor installed (VS Code is the champ, don't @ me)
- An existing codebase (if you need to get setup, you can follow "How to Setup a TypeScript + Node.js Project first and then come back to this article)
- An understanding of ESLint and a working configuration (see "How to use ESLint with TypeScript" for an example)
Installing Prettier
First thing's first, we'll install Prettier as a dev dependency.
npm install --save-dev prettierConfiguring Prettier
As per the docs, we can expose a JSON file called .prettierrc to put our configuration within.
touch .prettierrcA basic .prettierrc setting is the following:
{
  "semi": true,
  "trailingComma": "none",
  "singleQuote": true,
  "printWidth": 80
}
These settings specify the following rules:
semiset totruemeans that Prettier will add semicolons when necessary.trailingCommaset tononemeans that Prettier will remove any trailing commas at the end of objects.singleQuoteset totruemeans that Prettier will prefer single quotes instead of double quotes unless the number of double-quotes outweighs the number of single-quotes. Read more here.printWidthset to80specifies that the printer will wrap any lines that exceed 80 characters.
You can view the rest of the options here and change them as you like! This is just my personal preference.
Testing Prettier using the Prettier CLI
So far, we've locally configured Prettier, and we're in shape to test formatting some code.
Since we're using the code from simple-typescript-starter, the only file we have is src/index.ts, and it looks like this:
console.log('Hello')When we add a script to format all the code in the folder and execute it, the only change we should notice is an added semicolon.
Add the following script to your package.json.
{
  "scripts": {
    ...
    "prettier-format": "prettier --config .prettierrc 'src/**/*.ts' --write"  }
}
And then run it.
npm run prettier-formatThe console output shows that one file has been changed and that it took 186ms to execute.
npm run format

> typescript-starter@1.0.0 format /simple-typescript-starter
> prettier --config .prettierrc 'src/**/*.ts' --write

src/index.ts 186ms
Looking at src/index.ts, you'll notice that the console.log was, in fact, appended with a semicolon.
console.log('Hello world!');This is a neat way to use Prettier, but it's not the best, in my opinion. Here's what I prefer.
Using Prettier
One of the most common ways that people use Prettier is to install the VS Code extension that adds it to your editor.
It enables you to, on save, format your code. This is good because the feedback loop is incredibly short, and it turns formatting into something that you don't have to occupy any brain cycles thinking about.
Formatting using VSCode on save (recommended)
Install the Prettier VS Code extension here.
To set the defaults, press CMD + SHIFT + P (on MacOS) or CTRL + Shift + P (on Windows), then type in preferences open settings.
You want to select the JSON option so that we can manually edit the preferences via a JSON file.
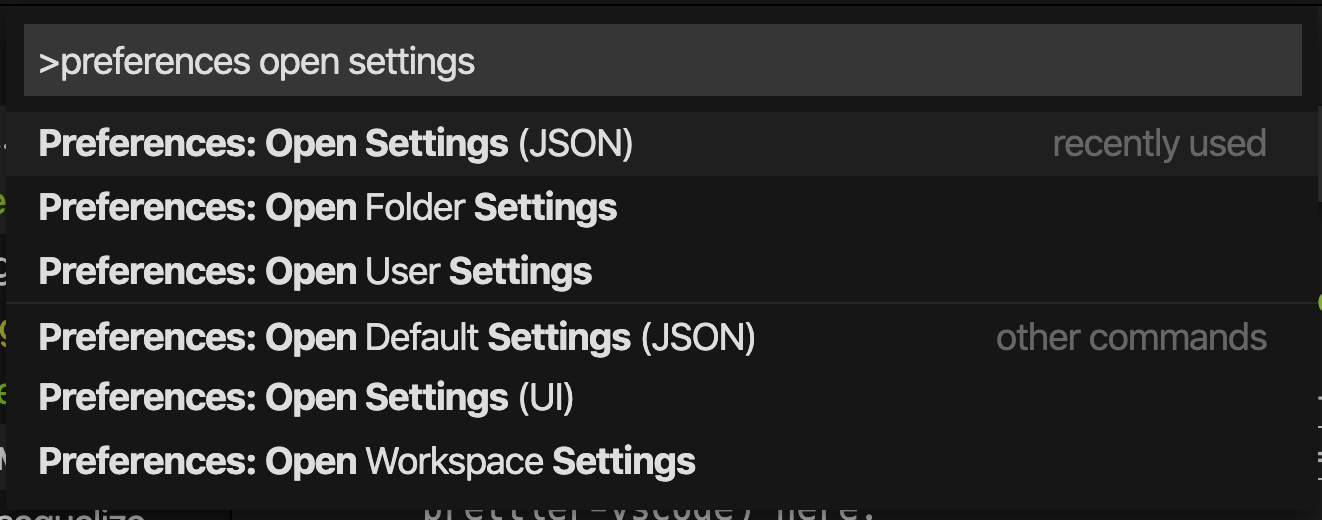
Options for typing in "preferences open settings". You want to select the JSON option.
In the JSON file, if it's not already added, add the following lines to the root of the object.
// Default (format when you paste)
"editor.formatOnPaste": true,
// Default (format when you save)
"editor.formatOnSave": true,
These settings will format your code both when you paste new code and when you save code for any file extension that Prettier understands. If the root of the project that the file lives in has a .prettierrc, it will use the settings that live in that file to format your code.
Let's say you're working with multiple languages and automatically formatting code in another language is a no go for you. You can also override the default settings by specifying the language as shown below.
"[typescript]": {
  "editor.formatOnPaste": false,  "editor.formatOnSave": false,},
"editor.formatOnPaste": true,
"editor.formatOnSave": true,
Using the above config, Prettier will not format TypeScript code on paste or save but it will format code on paste or save for any other language that it understands.
Formatting before a commit (recommended)
When working with other developers as a team, it can be challenging to keep the formatting of the code clean constantly. Not everyone will want to use the Prettier VS Code extension. Not everyone will want to use VS Code!
How do we ensure that any code that gets commited and pushed to source control is properly formatted first?
Read the next post, "Enforcing Coding Conventions with Husky Pre-commit Hooks".
Formatting using an filesystem watcher
If you really don't like VS Code or there are too many people on your team not using it, there's another option to tighten the feedback loop of formatting code as you're writing it.
The Prettier docsc suggest using a package called onchange in order to watch the filesystem for when changes are made to your source code, then run the Prettier CLI tool against any changed files.
Here's how that works.
Install onchange.
npm install --save-dev onchangeThen, add this script to your package.json, making sure to change the watched directory if you keep your source code in a location different the src folder.
"scripts": {
  "prettier-watch": "onchange 'src/**/*.ts' -- prettier --write {{changed}}"  }
Opening a new console, running prettier-watch, and editing code within the src folder will give us the same observable outcome as if we set Prettier up with VS Code or not.
Manually formatting a single file
On MacOS, if I've installed the VS Code extension, I can format the current file by typing SHIFT + OPTION + F.
This might be different for you. You can see what the command is by typing COMMAND + SHIFT + P and entering "format".

The command to format the current file in VS Code is shown here for me.
Configuring Prettier to work with ESLint
Here's where the real magic happens.
As a reminder, you'll want to have completed the previous ESLint tutorial first.
With ESLint and Prettier already installed, install these two packages as well.
npm install --save-dev eslint-config-prettier eslint-plugin-prettiereslint-config-prettier: Turns off all ESLint rules that have the potential to interfere with Prettier rules.eslint-plugin-prettier: Turns Prettier rules into ESLint rules.
Lastly, we need to make an adjustment to the .eslintrc.
{
  "root": true,
  "parser": "@typescript-eslint/parser",
  "plugins": [
    "@typescript-eslint",
    "prettier"  ],
  "extends": [
    "eslint:recommended",
    "plugin:@typescript-eslint/eslint-recommended",
    "plugin:@typescript-eslint/recommended",
    "prettier"  ],
  "rules": {
    "no-console": 1,       // Means warning
    "prettier/prettier": 2 // Means error  }
}
If you're not interested in using the recommended plugins, the most basic .eslintrc with Prettier enabled looks like this:
{
  "extends": ["prettier"],
  "plugins": ["prettier"],
  "rules": {
    "prettier/prettier": 2 // Means error
  }
}
Running npm run lint (from the previous article) lints the files and tells us all of the unformatted lines in addition to any code convention violations we've protected against through ESLint rules.
typescript-starter@1.0.0 lint /simple-typescript-starter
> eslint . --ext .ts

simple-typescript-starter/src/index.ts
  1:1  error    Replace `⏎console.log('Hello·world!')⏎` with `console.log('Hello·world!');`  prettier/prettier  2:1  warning  Unexpected console statement                                                 no-console

✖ 2 problems (1 error, 1 warning)
  1 error and 0 warnings potentially fixable with the `--fix` option.
That's it! Run npm run prettier-format to format everything.
Conclusion
You can find the code for this post here.
We're pretty lucky that tooling has advanced to the point where enforcing coding conventions and formatting code isn't something we have to personally concern ourselves with anymore.
Even if you're not using VS Code, you should be able to add some basic formatting to your code using the steps outlined in this post.
After that, the next step is to enforce your conventions and formatting within your team by using a tool like Husky.
Read the final post in this series titled "Enforcing Coding Conventions with Husky Pre-commit Hooks".
Not sure where you are on the path? Take the Phases of Craftship quiz — 7 questions, personalized results.
Stay in touch!
Join 20000+ value-creating Software Essentialists getting actionable advice on how to master what matters each week. 🖖
View more in Tooling